Clients and per-client policy
How to onboard a client for Identity Verification, preview its users, and set its method, assurance level, Face Check and consent, one client at a time or many at once.
Written By Chris Scaminaci
Last updated About 1 hour ago
Identity Verification is turned on per client, not for the whole helpdesk at once. You review clients in Client Onboarding, change one client on its own settings page, and review or change many clients together in the Client Settings tab of the management screen.
Before you start: the Identity Verification module must be on, and you need the Administrator or Identity Verification Admin role. Finish setup first, and for a client that uses Authenticator step-up have its Microsoft administrator consent.
How a client's policy is decided
A client's method and assurance floor come from the most specific place that sets them.
The wizard saves your choice as both the default profile and the organisation configuration, so a client without an override of its own normally shows the choice you made in the wizard.
On a call, a technician can choose a stronger method than the one the client resolves to with Verify a different way. A choice that would lower assurance is ignored.
A client that has never been configured has no settings of its own. It uses your organisation's method and floor, and Client Onboarding shows it as Disabled. Technicians see the verification panel only for clients that are enabled. To onboard a client, save its settings with Enable Identity Verification on or tick its Enabled box in the Client Settings tab. These also create a client's settings with Identity Verification on: any other change to the client in that tab (its mode, assurance floor or Face Check box, or a bulk apply that includes it), a successful Verify, and its administrator completing consent.
Review clients in Client Onboarding
Choose Onboard Clients on the management screen, or go to /settings/identity-verification/clients.
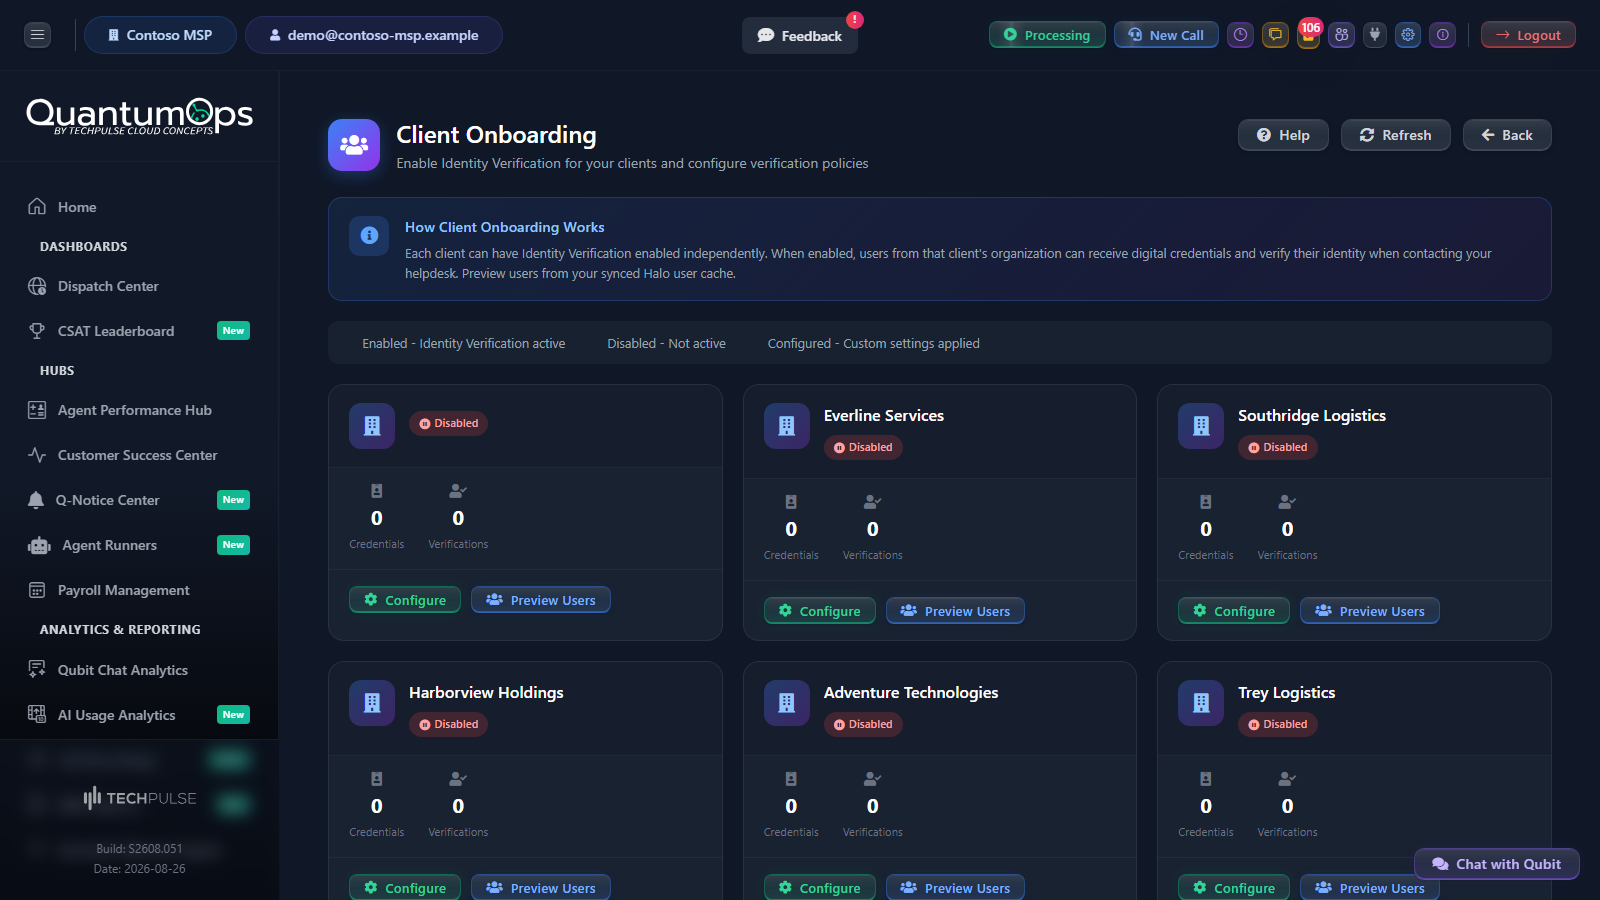
The page shows one card for each client, with its name, its status and two counts: Credentials issued and Verifications completed. The legend at the top explains the badges.
Enabled and Configured are independent. A client can be enabled and still inherit every value, and a client can carry its own settings while switched off. If the page shows No Clients Found, no clients are set up for your organisation yet.
Each card has two buttons:
- Configure opens that client's settings page.
- Preview Users lists the people at that client, so you can see who verification would apply to.
Preview a client's users
The list comes from the HaloPSA user cache, which QuantumOps keeps in sync with your PSA. It shows who exists at that client, not who holds a credential. Inactive users are not listed.
- Choose Preview Users on a client's card.
- Search by name or e-mail, filter by Site, or set Status to VIP Only.
- Read each entry: name, e-mail, site and preferred phone, with a star on VIP users.
Only the first 100 matches are shown, and a note under the list says so. Use the search to reach the rest. An empty list for a client that clearly has staff means the users have not synchronised from HaloPSA yet, not that verification is unavailable.
Change one client's settings
Choose Configure on a card, or the gear icon in the Client Settings tab. The page has Setup guide and Help buttons in its header, and the settings are saved with Save Settings. Cancel returns to Client Onboarding.
When you open a client that has no settings yet, a note says it inherits your configuration and that Identity Verification is on. The verification panel is still offered to technicians only after you save the settings with Enable Identity Verification on. When a client has been switched off, the page says that is a stored decision, and saving does not turn it back on unless you do.
Basic Settings
- Enable Identity Verification allows callers from this client to be verified.
- Require FaceCheck makes biometric facial recognition part of every verification for this client. Face Check works only with Microsoft Entra Verified ID, and it also has to be switched on for your organisation in the Configuration tab. Otherwise verification for this client is refused, because QuantumOps will not verify with no biometric check when the policy demands one.
- FaceCheck Confidence Threshold appears while Face Check is required. It runs from 50 to 100 in steps of 5. Higher is stricter, and 70 to 85 is recommended. The organisation-wide threshold in the setup wizard stops at 95, and the wizard recommends 70 to 80 (see Setting up identity verification). A failed match still bills, so a threshold high enough that real callers fail twice costs three matches per call. The number is stored only while Face Check is required here. With it off, the client uses your organisation-wide threshold, and turning Face Check off and on again does not lose the number you set.
Verification Options
Microsoft tenant & consent
This card is read-only except for one field.
- Customer Entra tenant id is filled in only when consent is granted or checked, after Microsoft has issued the app a token for that directory. It reads "Not consented yet" until then.
- Consent granted shows the date, in UTC, and who granted or checked it, or "Never".
- Authentication context id is the editable field. It applies only to clients with Entra ID P1, and the value is specific to each client's tenant. Leave it blank unless the client has P1 and you have created the context.
- Consent this client opens the setup guide, where you build the link to send.
Until the tenant ID and the consent date are both filled in, Authenticator step-up cannot verify anyone at this client.
Audit & Logging
Audit Log Level sets how much detail is recorded in this client's verification log entries: Minimal - Basic audit only, Standard - Recommended, Detailed - Full diagnostics or Compliance - Extended retention.
Advanced: raw verification policy
This card is collapsed unless the client already has a policy. Verification Policy (JSON) accepts these keys: requireFaceCheck, faceCheckThreshold, requireActiveCredential, expectedClaims, requiredClaims and rules. Any other key would be ignored when a verification starts, so the page rejects it. It also refuses text that is not valid JSON, a Face Check threshold outside 50 to 100, and rules without a verification type, because a policy that cannot be applied would otherwise be saved and then do nothing. Validate JSON checks the text before you save. Prefer the typed fields above, and use Verification policies for per-type rules: those rules beat this JSON.
Review and change many clients
The Client Settings tab of the management screen is the place to audit a fleet of clients. It shows what each client ends up with after inheritance, which the settings page does not. Choose Add Client to go to Client Onboarding.
Read the grid
Search for a client by name, and use the filter to narrow the list: All clients, Overridden here, From a partner profile, From the tenant default, Downgrade blocked or Consent outstanding. A count beside the filter shows how many clients match, and how many you have selected. The grid scrolls rather than paging.
Change settings
Each change in a row is saved straight away, and the grid reloads to show what the client now resolves to. A change to a client that has no settings of its own creates them with Identity Verification on, so changing only the assurance floor of a client you have not onboarded also onboards it.
To change several clients at once:
- Tick the clients, or tick the box in the header to select every client shown. A bar appears: "Apply to N selected".
- Choose any of Set mode…, Set assurance floor…, Set enabled… and Set FaceCheck… (Require Face Check or Don't require), and optionally enter Validity days from 30 to 180.
- Choose Apply. The selection clears when the save succeeds. If it fails, the selection and your chosen values stay so that you can try again.
Face Check applies only to Verified ID. When you apply it to clients that resolve to Authenticator step-up, those clients are skipped and a warning gives the count, so a skip is never silent. If you set the mode to Verified ID in the same apply, those clients count as Verified ID.
Revert to inherited clears the mode and assurance overrides of the selected clients so that they inherit again. It does not create settings for clients that have none. Clear selection deselects everything.
Consent and Verify
Consent opens an Admin consent dialog for the client. Enter the client's tenant ID or a verified domain of theirs and choose Build consent link. Then use Open in a new tab or Copy link to send it. Build a consent link covers the tenant rules, who can consent and what the client's administrator sees.
Verify asks Microsoft whether the app is already deployed, consented and effective in the client's directory, however the consent was granted. On a pass, the grid shows the consent date. A client with no tenant recorded opens the dialog first, and Verify deployment in the dialog does the same check for the tenant you entered. Check consent for every client at once explains the results and what each one records.
Verification policies
The list icon in Actions opens Verification policies for a client. Each rule applies to one verification type, and a client can have one rule per type. The usual type is standard.
- Enter the Verification type.
- Require an active credential is ticked for a new rule; untick it if the rule should not demand one, and tick Require Face Check as needed. Optionally set a Face Check threshold from 50 to 100. Leave it blank to inherit.
- Choose Save rule. To change a rule, use its pencil icon, then Save rule, or choose New rule to start another. The bin icon deletes a rule.
These rules are read when a verification starts and take priority over the JSON policy on the client's settings page.
Related
- Identity verification: the two methods and the assurance floor.
- Setting up identity verification: your Microsoft connection and client consent.
- Issuance campaigns: enrol a client's users once it is enabled.
- Verifying a caller: what technicians see on a call.
Was this helpful?
Still need help? Ask the team