Payroll employees
How to add the people who are paid through payroll, set their pay, overtime, premiums, schedule, rule group and timeclock PIN, and give one person a different rule from the rest of their group.
Written By Chris Scaminaci
Last updated About 2 hours ago
A payroll employee is a person who is paid through QuantumOps payroll. Each employee has a pay type and rate, overtime and premium multipliers, a contract, a schedule, a rule group and a timeclock PIN. An employee is either linked to a HaloPSA agent or stands alone.
Before you start. The Timeclock & Payroll module must be on. Create a rule group and a pay schedule first, so you can assign them. There are two editors:
- The Employees tab of the Admin Hub. The Administrator, Timeclock Admin and Payroll Admin roles can use it.
- The stand-alone page at
/timeclock/payroll/employees, titled Payroll Employees. The Administrator and Payroll Admin roles can use it.
Each editor has things the other does not. Where each option lives lists them.
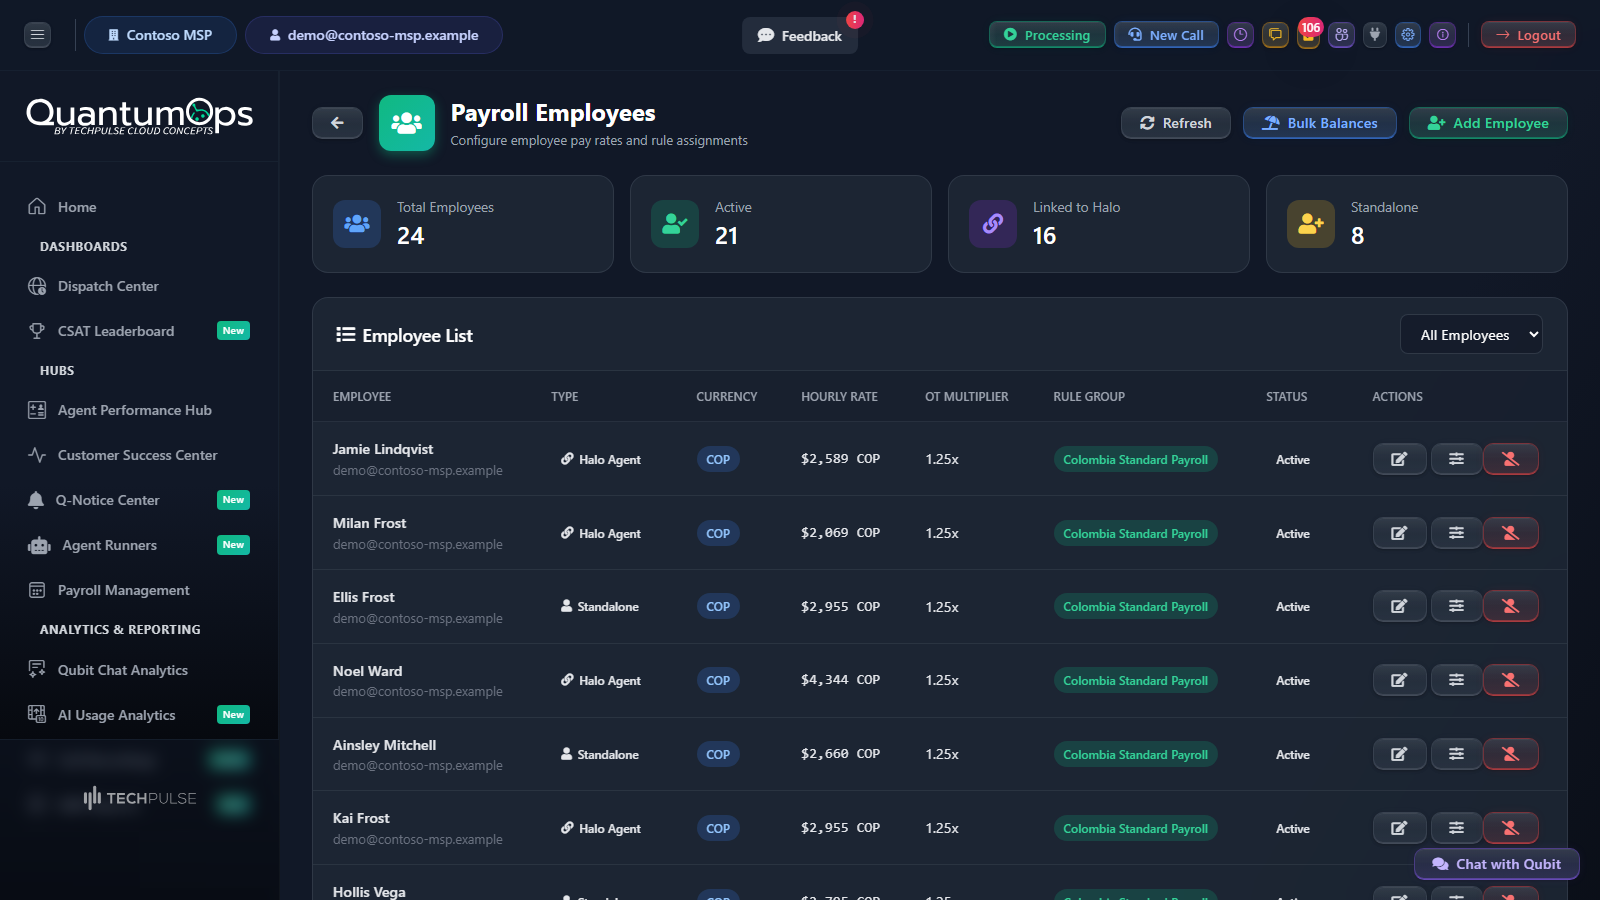
The employee list
Both editors show four counters (Total, Active, Linked and Standalone on the hub, or Total Employees, Active, Linked to Halo and Standalone on the stand-alone page) and a list with the Employee, Type, Currency, Hourly Rate, OT Multiplier, Rule Group and Status of each person. The filter above the list switches between All Employees, Active Only and Inactive Only.
Add an employee
- Choose Add Employee.
- Under Employee Type, choose Standalone Employee (not a Halo agent) or Link to Halo Agent.
- For a linked employee, pick the person in Select Halo Agent. The Full Name and Email are filled in from the agent and cannot be edited here. For a standalone employee, type them.
- Fill in the pay, overtime, contract and schedule fields described below.
- Choose Add Employee to save.
New employees start with USD, an Overtime Multiplier of 1.5, a Weekly Hours Threshold of 40, hourly pay, a Hire Date of today, a Contract Type of Permanent and 40 Expected Weekly Hours. They start on the period-wide overtime mode. The holiday, night and Sunday multipliers start at 1.0, which means no premium.
A linked employee is the same person as the agent. Their timeclock PIN is stored on the agent. If the agent already has a PIN, the form says so.
Pay: hourly or salary
Pay from salary
On the Admin Hub, when Pay Type is Salary and a salary is entered, a Salary-Based Calculation section appears. Tick the box that begins "Calculate pay from salary" to pay the salary for each period whatever the punches say. The salary is prorated when the person is hired or leaves part way through a period. Punches are then used only to raise exceptions when the hours are far from what is expected:
- Expected Weekly Hours is the number of hours you expect each week.
- Variance Threshold (%) raises an exception when the actual hours differ from the expected hours by more than this percentage.
- Variance Threshold (Hours) does the same for a number of hours. Either threshold can raise the exception. With neither set, no exception is raised.
Pay Type on its own does not pay the salary. Pay comes from the salary only when "Calculate pay from salary" is ticked. Otherwise it comes from the punches and the Hourly Rate.
The stand-alone page has no salary-based box, so an employee set to Salary there is paid from punches and the hourly rate. Use the Admin Hub, or Set Salary Mode in the bulk operations. See Time-off balances, accruals and bulk changes.
Deduct for missed time
When Pay Type is Salary, a Salary Deduction Settings section appears on both editors.
- Auto-Deduct for Missed Time takes money off the salary when the hours worked are below the expected hours and no approved PTO covers the difference. When it is off, nothing is deducted. A shortfall raises an exception only if the employee has a Variance Threshold (%) or Variance Threshold (Hours) set on the Admin Hub, under Salary-Based Calculation. It applies to employees who are paid from salary.
- Deduction Method is Hourly (uses the hourly rate) or Daily (uses the daily rate).
- Daily Rate Override is shown for the Daily method. Leave it blank to work the daily rate out from the salary and the working days in the month.
Overtime and premiums
A Colombian rule group counts overtime per week and has its own default weekly threshold. How pay is calculated gives the rule in full.
The night window and the holiday dates come from the employee's rule group. See Payroll rule groups and Holiday calendars and holiday shift bidding. The calculation itself is in How pay is calculated.
Colombian overtime multipliers
Three more multipliers are on the stand-alone page only. Colombian payroll pays overtime at rates that already include the night or Sunday surcharge, so these rates replace the surcharge instead of adding to it.
Leave a field at 0 and the calculation works the rate out for you. A night overtime rate of 0 uses the Overtime Multiplier. A Sunday or holiday overtime rate of 0 uses the overtime rate plus the Sunday or holiday surcharge in a Colombian rule group, and the stacking settings in any other group.
When you save an employee in a Colombian rule group with a holiday multiplier of 1.0 or less, a notice explains how the holiday is paid. To fill in the Colombian defaults for employees who already exist, see Colombian payroll defaults backfill.
Contract and schedule
- Contract Type is Permanent, Contractor or Part-Time.
- Expected Weekly Hours is the standard week in the contract.
- Shared Schedule is the shift pattern: work days, hours, shift times and rotations. Choose Manage to create or edit patterns. See Employee schedules.
- Payroll Schedule is the pay schedule that says when the person is paid. It is a different thing from the shared schedule. See Pay schedules.
- Rule Group sets the deductions, contributions and allowances. An employee with no rule group gets none, and the Configuration Status card on the hub warns about it.
- Hire Date matters for the first period and for accruals.
- Notes is free text.
Set the timeclock PIN
The PIN is what the person types on the employee timeclock. It is 4 to 6 digits and is stored in a form that cannot be read back, so you can replace it but not look it up.
- In the employee form, find Timeclock PIN.
- Enter the new PIN. If one is already set, the form shows PIN Set. Choose Change PIN first.
- Save the employee.
Enter digits only. Anything that is not 4 to 6 digits is ignored, and the PIN stays as it was.
You can also set the PIN of a linked person in Team Management. The Edit team member dialog has a Timeclock PIN section for members with a HaloPSA agent. Enter 4 to 6 digits and choose Set PIN. It is saved at once, without choosing Save changes, and A PIN is set appears. Team Management is open to administrators only. See Inviting people, roles and agent links.
Mark a supervisor
The same dialog has a Supervisor tick box for members with a HaloPSA agent, described as "can manage other employees' timeclock entries". Tick Supervisor and choose Save changes. Unlike Set PIN, the tick is not saved until you do. It matters: adding manual punches, forcing a clock-in or clock-out, and editing punches on the supervisor screens are refused with a "Supervisor permissions required" message unless the signed-in person's own agent is marked Supervisor. See Supervising punches, exceptions and time off.
Give one employee a different rule
Use Rule Overrides when one person's deduction should differ from the rest of their rule group. They are on the stand-alone page only.
- On
/timeclock/payroll/employees, choose the sliders icon, Rule Overrides, on the employee's row. The employee needs a rule group, because you pick from its active rules. - Under Select Rule, choose the rule.
- Either tick Exempt from this rule, which skips the rule entirely for this person, or fill in what changes: Override Value, Override Employee %, Override Employer %, Override Min Amount and Override Max Amount. A field you leave blank keeps the value of the rule.
- Set Effective From and Effective To to limit the dates. Leave Effective To blank for no end date.
- Enter a Reason. It is required.
- Choose Add Override.
Override Employee % and Override Employer % mean what the employee and employer shares mean on the rule: parts of the rule's own amount. See Payroll rule groups. The dates are compared with the day you calculate payroll, not with the dates of the pay period. Add one override for each rule. To change it, choose its edit icon, then Update Override. Choose Remove to stop an override applying. Cancel Edit leaves the form without saving.
Edit balances for everyone at once
On the stand-alone page, Bulk Balances opens a table of the active employees with their Accrued PTO, Used PTO, Personal Granted and Personal Used hours, and the balances that result. Change the numbers directly and choose Save All Changes. Rows that changed are saved, and a tick shows beside each row that saved. See Time-off balances, accruals and bulk changes for single-employee adjustments, leave entries and the bulk operations on the Admin Hub.
Deactivate and reactivate an employee
Use the Deactivate icon on an employee's row and confirm. The employee is marked inactive and today becomes their termination date. Their history stays. Choose Inactive Only in the filter to find them. The Reactivate icon makes them active again and clears the termination date.
An inactive employee is left out of every calculation and recalculation from then on, including the pay period that holds their last days. Deactivate a leaving employee only after the pay period that contains their last day has been calculated.
Where each option lives
Related
Was this helpful?
Still need help? Ask the team